Getting started with Identity and Access Management (a.k.a. IAM) can be frustrating, especially if we are going to start from scratch and we need to deal with identity federation and some enigmatic protocols such as SAML, OAuth, OIDC, etcetera.
Note: this post is part of a series dedicated to AWS IAM Identity Center (a.k.a. IAM IC) and related integrations. Check out all the “episodes” following the tag #aws-auth-series.
Table of contents
Open Table of contents
IAM Identity Center, in a nutshell
If you have to manage different accounts in AWS with a centralized fashion, you should definitely have a look at AWS Organizations. In this case, you’ll probably soon need to manage workforce identities and access policies in one central place. That’s the moment when IAM Identity Center (IAM IC, for short) comes into play. IAM Identity Center, formerly known as AWS SSO, is the recommended AWS solution oriented to the management of this scenario. For customer IAM (CIAM), however, you’d probably better rely on AWS Cognito (check this talk out for more about IAM IC).
IAM IC does have tons of features. First of all, as mentioned, you can use it as an identity source (i.e., where you manage users and groups). If you already have an external identity source such as Active Directory, you can simply bind it to IAM IC.
Federating identities for custom applications with SAML
What about custom applications? The good news is that we can leverage IAM IC for this purpose as well. In the next part of the post, we are going to play with an example where a custom Node.js application acts as the Service Provider (SP), using IAM IC as the Identity Provider (IdP), in a SAML-based scenario. In other words, workforce users that can log in to AWS IC can SSO into our Node app.
Setting up IAM Identity Center (IdP)
This example assumes that we have already enabled IAM Identity Center in the management account of an organization with some users in it. If you need help with those very first steps, you can watch this video walkthrough. It’s really well done!
Now, we need to go to IAM Identity Center > Applications and click on the “Add application” button. Then, a 2-step wizard begins.
IdP Wizard - Step 1
In the first step, we’ll be asked to select the application type. Select “I have an application that I want to setup”. Then, scroll down and select SAML 2.0 as the application type.
IdP Wizard - Step 2
The second step is dedicated to the setting of the SAML trust relationship between IAM IC (again, the IdP), and our Node application (our SP). We are going to deal with this information:
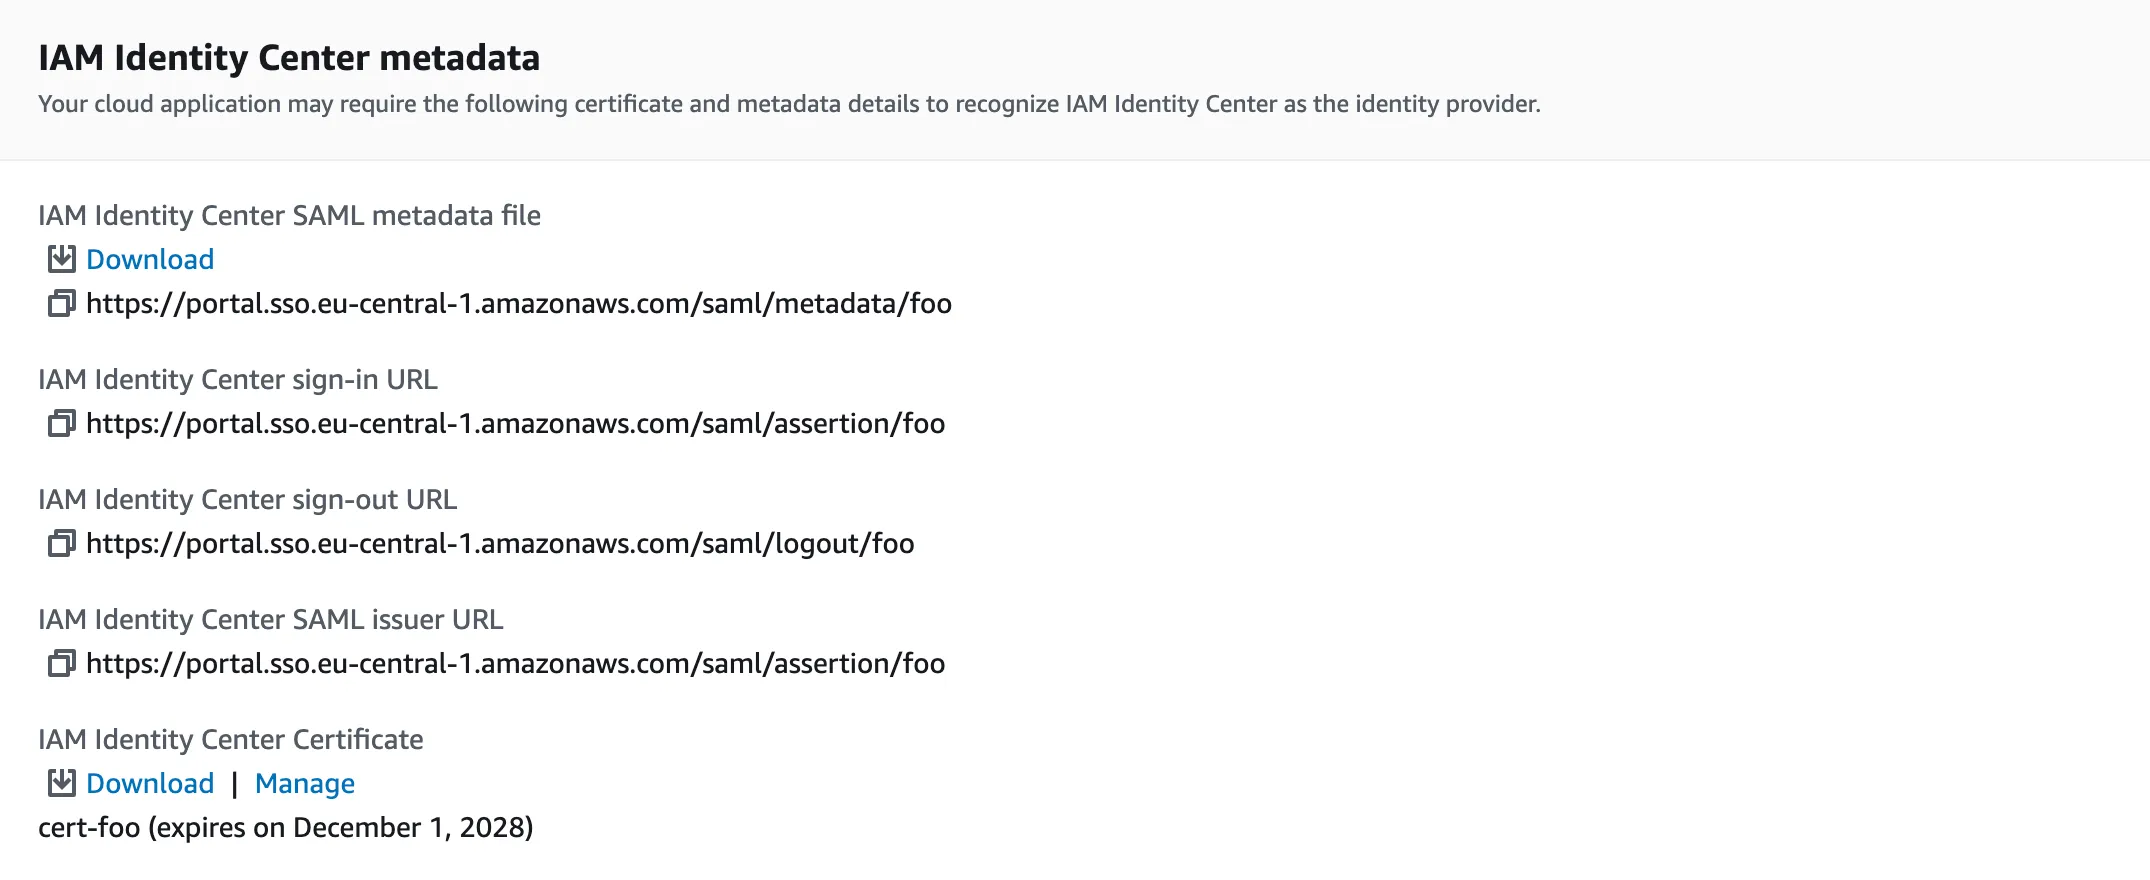
- IAM IC metadata (IdP)
- IAM IC certificate (IdP)
- Node application metadata (SP)
If the SP application supports metadata import, download the IAM Identity Center SAML metadata file (XML). Otherwise, for this demo purposes, just copy the IAM Identity Center sign-in URL, because we’ll need it later. Make sure to download the IAM Identity Center Certificate.
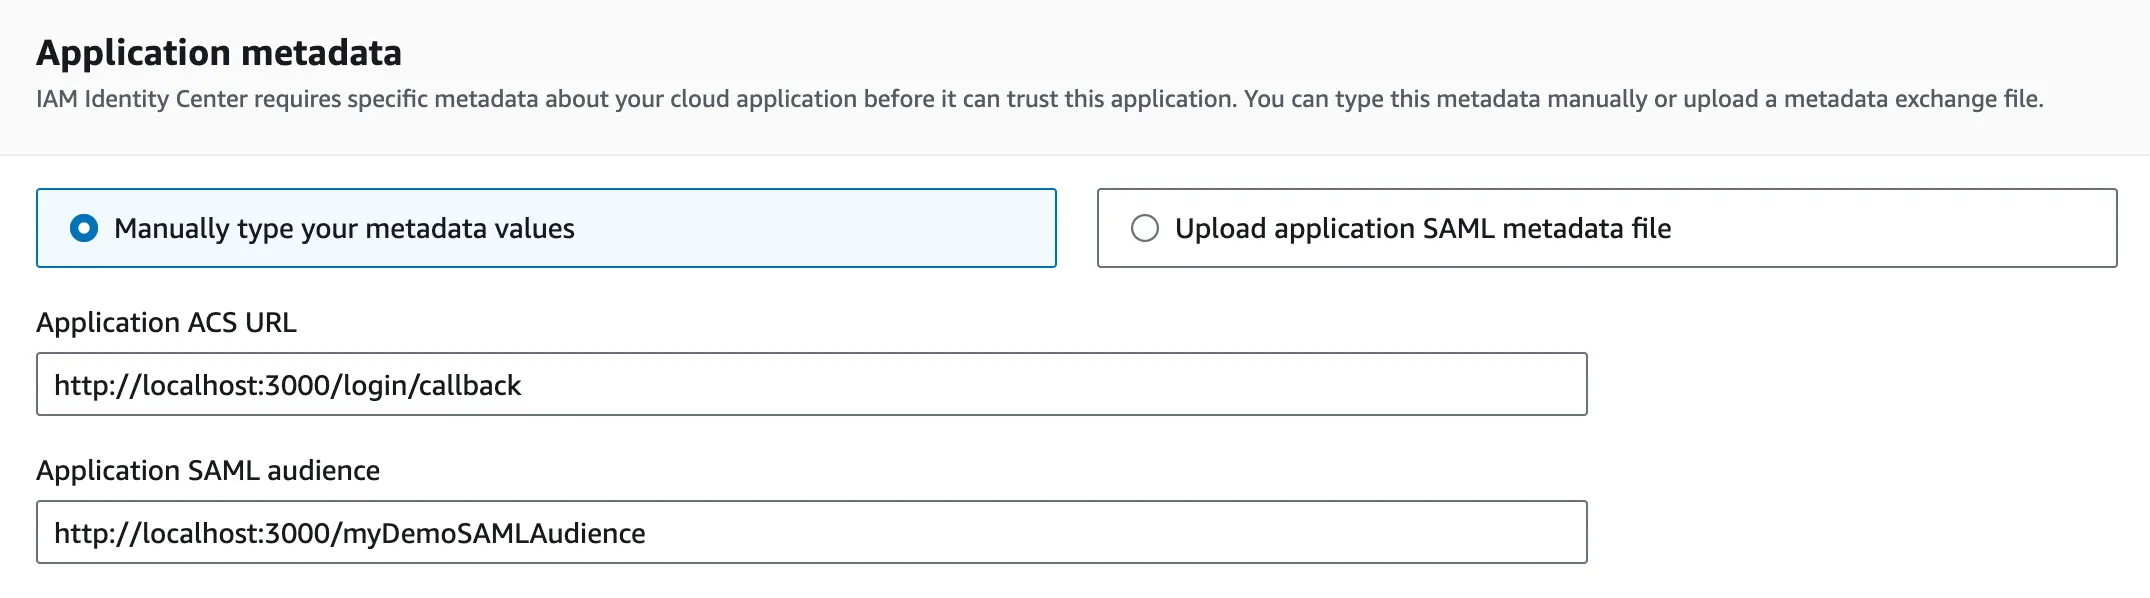
Now, you are expected to tell IAM IC the metadata of our app, namely the SP metadata:
- the Application ACS URL: the callback URL used by our app to process
responses from IAM IC:
- set to
http://localhost:3000/login/callback(note that you do not need to make your app directly reachable by IAM IC) - this maps to the
AssertionConsumerServiceURLattribute in the SAML Request
- set to
- the Application SAML audience: a predefined string to set in the trust
process, and it needs to match on the IdP and the SP side:
- set to
http://localhost:3000/myDemoSAMLAudience - this value maps to the
Issuerelement in the SAML Request.
- set to
Assigning users
We now need to assign IAM IC users to our App. Go to IAM Identity Center > Applications > Your app name, and then assign users and groups to our app in order to let them log in to it. For users of this demo, we should define:
- Username
- Email address
- First name
- Last name
- Display name
Mapping attributes
Finally, we define how IdP attributes map to the SP counterpart. Go again to IAM Identity Center > Applications > Your app name. This time click on the “Actions” button, and then on Edit attribute mappings. We set the mapping as follows:
| User attribute in the application | Maps to this string value or user attribute in IAM Identity Center | Format |
|---|---|---|
| Subject | ${user:email} | emailAddress |
| preferredUsername | ${user:preferredUsername} | unspecified |
| subject | ${user:subject} | unspecified |
| givenName | ${user:givenName} | unspecified |
| familyName | ${user:familyName} | unspecified |
| Foo | This is just text | unspecified |
| name | ${user:name} | unspecified |
| ${user:email} | unspecified | |
| AD_GUID | ${user:AD_GUID} | unspecified |
and we are done!
Setting up our application (SP)
Now it’s time to run our application. Clone
this repo, and set env variables
in the .env file as follows:
# .env

IDP_ENTRYPOINT='IAM Identity Center sign-in URL (get it from  IAM IC metadata)'
IDP_AUDIENCE='http://localhost:3000/myDemoSAMLAudience'
SESSION_SECRET='mySessionSecretKey'
Then, rename the certificate provisioned by IAM IC into cert.pem, then copy it
into the repo directory cert.
Finally, run npm install && npm start.
Federation and SSO in action
Now, open up the URL http://localhost:3000 into your browser. You should be redirected to the IAM IC log-in page.

Fill in the login form with a valid username and a password, and you are logged in! You should land on the welcome page of our Node app echoing some user and SAML details from the SAML response.
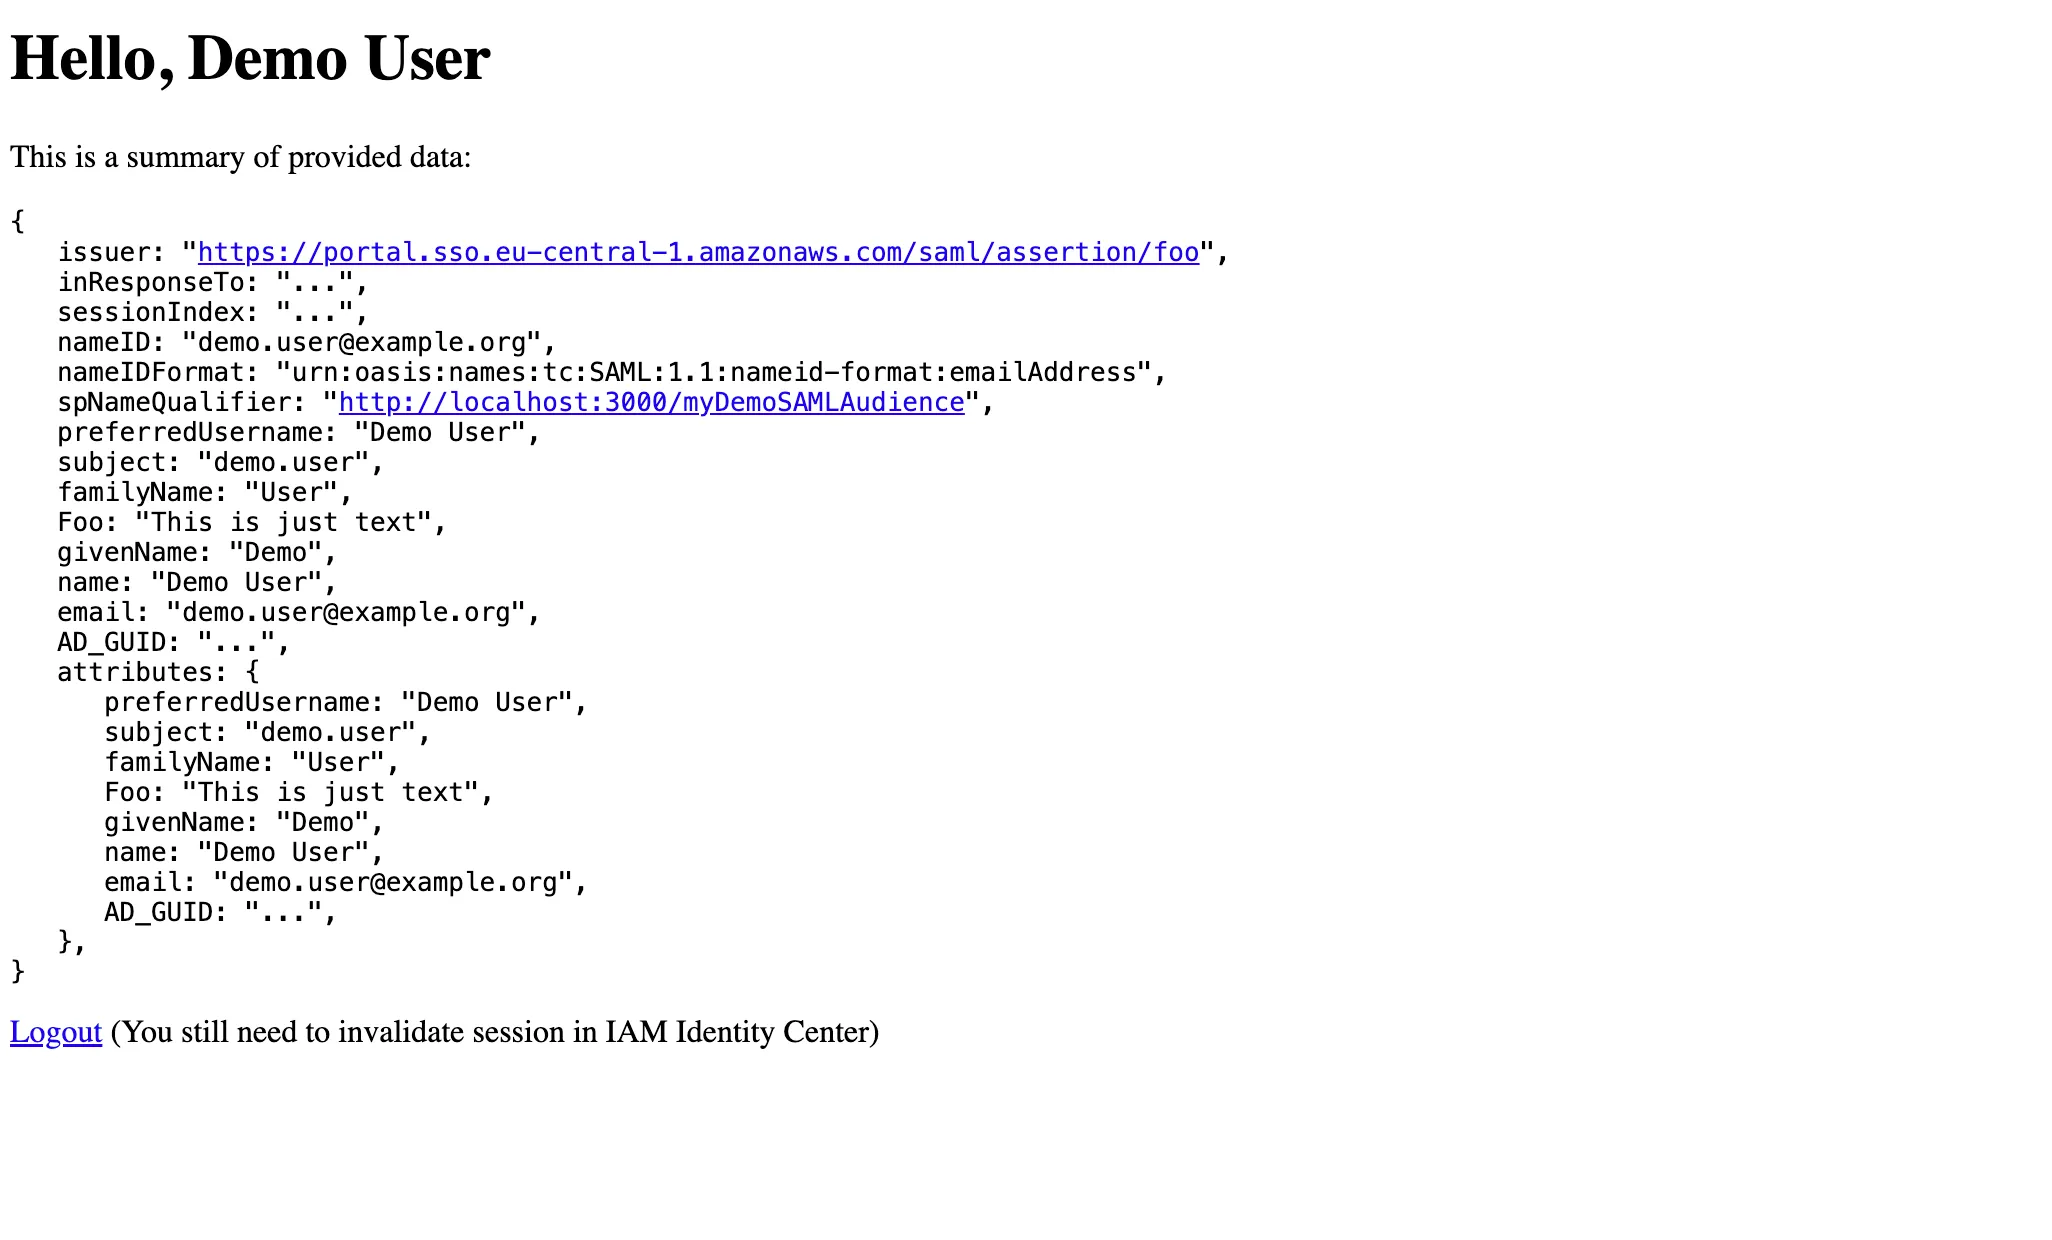
The SAML trust that we have just configured allows the IAM IC user to log in to our Node app. This is a very brief example of SSO via SAML, backed by AWS IAM Identity Center.
Other References and Credits
The main idea of this blog post comes from this video. Here, I updated the Node app, and I used the latest version of IAM IC.
Cheers!
^..^